I realize that some of you reading this tutorial may have never used an icon font before. You may even be asking yourself, what exactly is an icon font? Icon fonts are simply another way of displaying icons on your websites.
In the past, it was a common practice to use images as icons. But using images for icons usually results in additional requests to the server. So to address this problem, designers have turned to icon fonts.
An icon font is exactly like a normal font. The only difference is, instead of a letter mapped to a character or a Unicode area, you’ll have a symbol.
About Font Awesome icons
Font Awesome is a rich collection of 400+ icons. This library is completely free for both personal and commercial use.
In this tutorial, I am going to show you how to install and use Font Awesome icon fonts in WordPress. You can install a WordPress plugin to use icon fonts, or if you are a technical person, you can do it manually.
Using Font Awesome icons with a plugin
Better Font Awesome is a free and popular plugin (20,000+ active installs) to use FontAwesome icon on your WordPress site.
This free plugin allows you to automatically integrate the latest available version of Font Awesome into your WordPress site, along with accompanying CSS, shortcodes, and TinyMCE icon shortcode generator.
Login to your WordPress dashboard, go to Plugins > Add new. Search for “Better Font Awesome”, install and activate this plugin.
Now go to Settings > Better Font Awesome to learn about basic settings. There are few basic settings. You can use minified CSS, hide admin notices and Better Font Awesome can also attempt to remove Font Awesome CSS and shortcodes added by other plugins and themes.
You can very easily add icons to your posts and pages. Just click the Insert Icon button and select your desired icon to add in your post.
(There are many free alternative plugins available at the WordPress plugin directory. AGP Font Awesome Collection has 10,000+ active installs, and Font Awesome 4 Menus has 30,000+ active installs.)
Using Font Awesome icons manually
Now I will show you how to use FontAwesome icons on your WordPress website without any plugins.
Getting started with Font Awesome is not difficult. You can simply paste a line of code in the head section of your HTML document. But to use Font Awesome in WordPress we have a much more advanced function called Enqueuing. We will use this function to register a Font Awesome CSS document.
Getting started: Create a child theme
Child themes are a great starting point to customize WordPress themes. With child themes you can incorporate co-author plus plugin into your theme or even code a custom landing page for products. For this tutorial, I have created a child theme. If you are a beginner and don’t know about WordPress child themes, read this tutorial to learn how to create a WordPress child theme.
We need only 3 files in our child theme. function.php, style.css and screenshot.png (optional).
Open your style.css file and add following code:
/*
 Theme Name:   DeveloperDrive Child
 Theme URI:    http://www.DeveloperDrive.com/
 Description:  A Twenty Sixteen child theme
 Author:       Tahir Taous
 Author URI:   http://www.DeveloperDrive.com
 Template:     twentysixteen
 Version:      1.0.0
*/
Now go to WordPress dashboard and create activate child theme. Visit front end of your website. You won’t see any style. Don’t worry we need to enqueue the parent style-sheet.
Enqueuing styles
By enqueuing styles and scripts, we can control where, when, and how each stylesheet and each script is called and what dependencies each of them have. Enqueuing of the stylesheets and scripts is done from functions.php file.
We are using Enqueue function to register parent and child theme’s stylesheets.
We also need to get Font Awesome icons onto our site. The easiest way to to include Font Awesome on our site is to call the Bootstrap CDN stylesheet.
You can visit Font Awesome getting started page to learn more.
Visit the getting started page and scroll down. You will see following line of code.
<link rel="stylesheet" href="https://maxcdn.bootstrapcdn.com/font-awesome/4.5.0/css/font-awesome.min.css">
As i said earlier, we will use the Enqueue function to include Font Awesome styles in our WordPress site. We need https://maxcdn.bootstrapcdn.com/font-awesome/4.5.0/css/font-awesome.min.css url only. Open your child theme’s functions.php and add the following code.
<?php
	function theme_enqueue_styles() {

	    $parent_style = 'parent-style';

	    wp_enqueue_style( $parent_style, get_template_directory_uri() . '/style.css' );

	    wp_enqueue_style( 'my-child-fontawesome', '//maxcdn.bootstrapcdn.com/font-awesome/4.5.0/css/font-awesome.min.css' );

	    wp_enqueue_style( 'child-style',
	        get_stylesheet_directory_uri() . '/style.css',
	        array( $parent_style )
	    );
	}
	add_action( 'wp_enqueue_scripts', 'theme_enqueue_styles' );
?>
To make sure everything is working fine, visit the front-end of your site. If you see any errors check all the code.
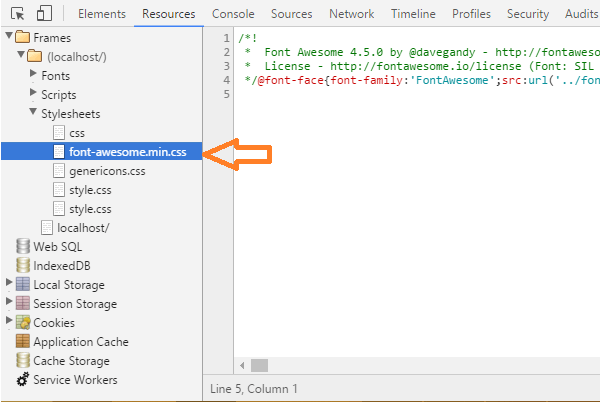
Now we need to make sure that fonts are queued up. To see if the fonts are queued up i am going to use Chrome Developer tools. To open Chrome Dev Tools, right click any where on the screen, go to Resources tab > Frames > LocalHost.
In the screenshot below you can see a list of all the different things including Fonts, Scripts and stylesheets. If you will select Style-Sheets, you will see a whole bunch of different stylesheets. Most importantly font-awesome.min.css.
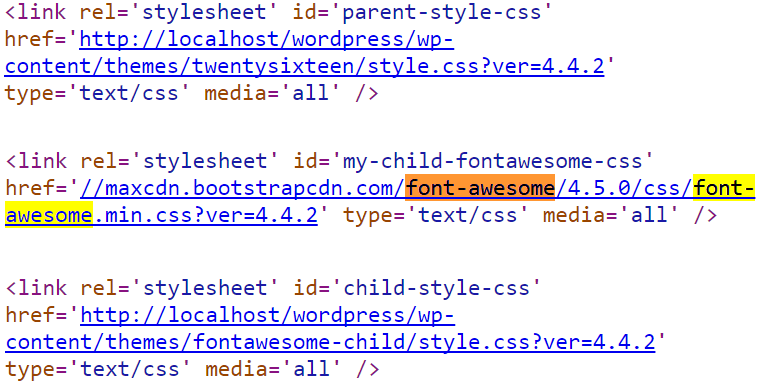
Alternatively you can right click anywhere on your web-page, select view source and search for font-awesome:
What we have done:
- Registered parent theme’s styles
- Registered Font Awesome styles
- Registered child theme styles
Now we know that we have our styles queued up. All we need to do is to go into styles.css file and tell WordPress where we want to apply those icon fonts.
How to use Font Awesome
After you get up and running, you can place Font Awesome icons just about anywhere with the <i> tag. Then, you have to assign them two classes. The
faclass plus a second class, which should be the name of the icon you want to add to your project, for instance
fa-home,
fa-checkor any other icon name.
Add the following code anywhere on your WordPress site (Page, post or Widget) and you you should see Font Awesome icons on your website.
<i class="fa fa-check fa-5x"></i>
<i class="fa fa-check fa-4x"></i>
<i class="fa fa-check fa-3x"></i>
<i class="fa fa-check fa-2x"></i>
<i class="fa fa-check"></i>
<hr>
<i class="fa fa-wifi fa-5x"></i>
<i class="fa fa-wifi fa-4x"></i>
<i class="fa fa-wifi fa-3x"></i>
<i class="fa fa-wifif fa-2x"></i>
<i class="fa fa-wifi"></i>
<hr>
<i class="fa fa-twitter  fa-5x"></i>
<i class="fa fa-facebook  fa-4x"></i>
<i class="fa fa-trello fa-3x"></i>
<i class="fa fa-whatsapp fa-2x"></i>
<i class="fa fa-youtube fa-2x"></i>
![]()
In sidebar widget you can see Font awesome icons with different sizes. I have also included a Check icon to the current menu item. WordPress allows you to easily style your current active menu item. I have used following CSS to to style current menu item.
li[class*="current-menu-item"] {
    background: rgba(35, 236, 152, 0.59);
    font-family: Georgia;
    padding-right: 15px;

}

li.current-menu-item a{
    text-transform: uppercase;
    position: relative;
    left: 20px;
    top: 0;
    color: green;
    background: #e3e3e3;
    font-family: Georgia;
}


li.current-menu-item::before
    {
    font-family: 'FontAwesome';
    content: '\f00c';
    position: absolute;
    font-size: 120%;
    position: absolute;
    left: 1px;
    top: 5px;
    margin-right: 5px;
    color: green;
}
We have a list item with a class of current-menu-item. And then in the CSS, we’re using the before pseudo selector to say: hey, go ahead and display this particular character encoding, f00c, which, in this case, is the symbol for check, so it would show the check icon. Make sure that in your CSS, that icon font (FontAwesome) is being used for its font family.
I have also used different background colors to highlight current menu item list item and link.
Bear in mind that for CSS stylesheets you will have to use Unicode and not the actual CSS class, To add any icon on your pages, posts or widgets you can use Font Awesome classes.
How to add Font Awesome icons to menu items
Have you see awesome menus on other awesome WordPress websites and wondering how you can add different icon to each menu item. See the screenshot below, i have added different icon for each menu item.
![]()
It is very easy to add font awesome icons to each menu item. Go to Menus and select your menu. Select your link and use
itag with two required classes. For example for home menu you can use <i class=”fa fa-home”></i>
You can see the names of all the available icons in the package in Font Awesome cheat sheet.