One of the best (and, as of recent, easiest) ways you can secure your WordPress website is by installing an SSL certificate to its domain. And while it was it was both difficult and costly to get started with SSL in the past, certificate authorities have recently emerged that take all the heavy lifting out of it.
In this post, we’ll start off by discussing what SSL certificates are and why you should have one installed on your site’s domain. We’ll also walk you through a quick tutorial on how you can set one up for yourself using the open source certificate authority, Let’s Encrypt.
Let’s get right to it!
What Is an SSL Certificate?
Whenever you send or receive information over the web it’s done using the HTTP protocol. So, for instance, if a visitor were to access your site, an HTTP connection would be established between your website and the visitor’s web browser and the data would be passed along over that connection.
By default, HTTP connections aren’t encrypted which means that hackers can potentially intercept any data that is sent over the protocol. But when you add an SSL certificate to your site’s domain, the connection – which is now HTTPS (HTTP + SSL) – becomes encrypted. Simply put, an SSL certificate guarantees that visitors can access your site securely and interact with it without risking their data being compromised.
There are three different types of SSL certificates:
- Domain Validated;
- Organization Validated Certificate;
- Extended Validation Certificate.
The encryption levels are the same for each type of certificate, however, the vetting and verification processes that the user needs to go through to obtain the certificate and how the browser address bar appears after the certificate has been installed varies.
Why Your Site Should Have an SSL Certificate
As we briefly mentioned before, installing an SSL certificate on your website creates a secure, encrypted connection for your site’s visitors. This is especially useful for website owners who run e-commerce stores or membership sites.
Aside from this, here are a few more reasons why you may want to consider installing an SSL certificate:
- Good for SEO. Google has already stated that sites running on the HTTPS protocol will be ranked higher in their ranking algorithm.
- Online transactions. Allowing customers to enter their credit card details and other personal information on your site without worrying about it being compromised is incredibly important. Having an SSL certificate allows visitors to rest assured that their information is safe.
- Web forms. Forms are everywhere and if you have one on your site that requires the user to fill in personal information then you’re going to need to make sure they feel safe giving it to you via a web form. The green padlock in the address bar will help you build trust.
If you’d like to learn more about the benefits of installing an SSL certificate, be sure to check out our post on Moving Your Website to HTTPS, Is It Worth It?.
How to Install a Free SSL Certificate on Your WordPress Website
Let’s Encrypt offers free, domain validated SSL certificates to everyone making it a whole lot easier to secure and encrypt your website. In this section, we’ll show you how you can install a free SSL certificate on your WordPress website – in three steps.
Before we begin, we recommend that you take a complete backup of your website since we’ll be updating our site’s URLs.
Step 1: Log in to Your cPanel Account and Install the Free SSL Certificate
Many reputable hosting providers allow their users to install free SSL certificates acquired from Let’s Encrypt from within their cPanel accounts. Here’s how:
To get started, log in to your cPanel and head over to WordPress Tools. Next, click on the Security tab, make sure you’ve selected the domain you’d like to install the certificate to, and toggle the Free SSL Certificate button On.
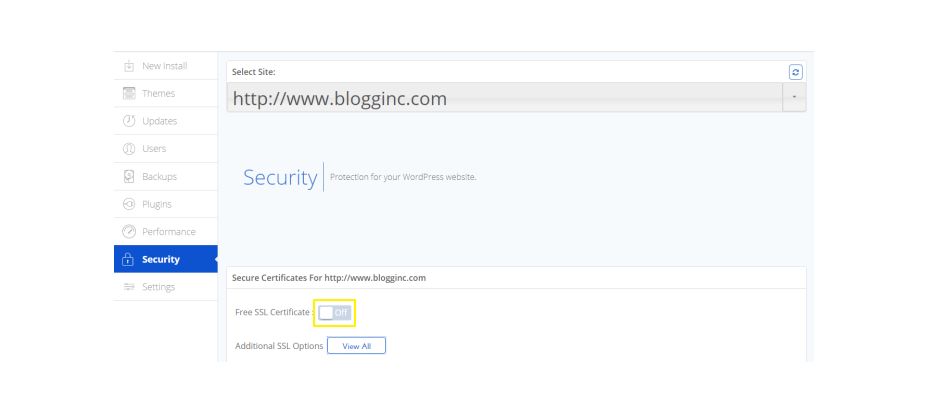
The menu pages and options might be named differently depending upon the hosting provider you’re using though the process remains the same.
If, however, your WordPress website is hosted with a provider that doesn’t offer free SSL certificate installation then you can take the DIY approach instead. To do this, simply open up your site’s .htaccess file in a text editor and add the following lines of code:
RewriteEngine On
RewriteCond%{SERVER_PORT} 80
RewriteRule ^(.*)$ https://www.your-domain.com/$1 [R,L]
Step 2: Update Your WordPress Website’s URLs
At this point your website is technically using the HTTPS protocol. However, since you haven’t yet updated your site’s URLs, your incoming traffic is actually landing on the insecure http:// links and redirecting to the secure https:// links. And for this reason, it’s important that we update our site’s URLs from the back-end to inform web browsers of the modifications we’ve made. Here’s how:
For New WordPress Sites
If you’re installing an SSL certificate on your brand new WordPress site then you can simply update its URLs from the Settings page. Log in to your website’s admin panel and head over to Settings > General.

Next, scroll down to the WordPress Address URL and Site Address URL options and replace http with https in both of the text fields.
Click the Save Changes button at the bottom of the page to save changes and continue.
For Existing WordPress Sites
For those of you who already have an existing WordPress website that’s being indexed by search engines, the recommended way to update your site’s URLs safely is by using a plugin.
We recommend going with the Really Simple SSL plugin because it’s incredibly easy to use and doesn’t have lengthy (or any for that matter!) settings for you to go through. In fact, once you install and activate the plugin to your site, it’ll automatically detect and update your site’s URLs.
Log in to your WordPress website’s admin panel and navigate to Plugins > Add New. Next, search for Really Simple SSL from the Add Plugins screen.
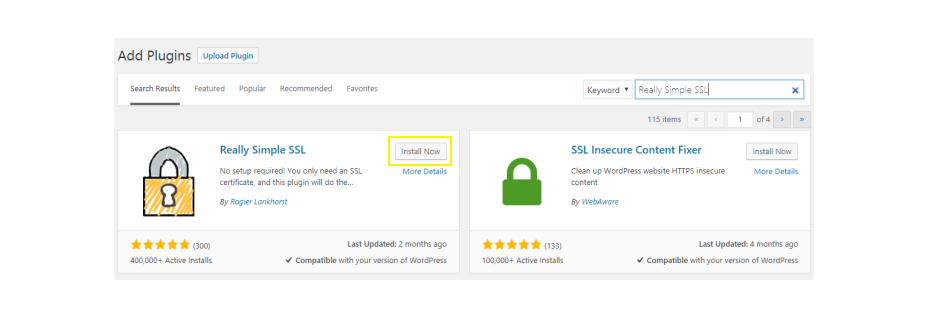
Click the Install Now button to install the plugin to your website. And once the plugin is done installing, activate it. You should see a note displayed on the top of your screen prompting you to complete the SSL activation.
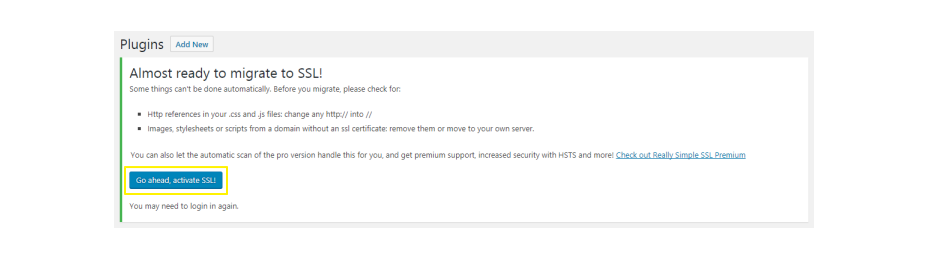
Click the Go ahead, activate SSL! button to proceed. If everything goes well, you should see a message that looks something like this displayed across the top of the page:

Step 3: Update Your Website’s Settings in Google Analytics
If you have a Google Analytics account linked to your WordPress website then you’re going to want to update its URLs from there, as well. Here’s how:
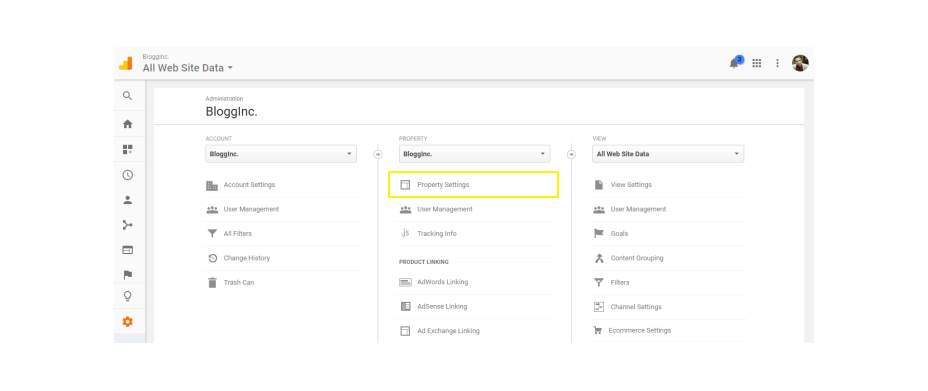
Log in to your Google Analytics account and navigate to Admin > Property Settings.
From the Basic Settings section, scroll down to the Default URL option and change it from http:// to https://.
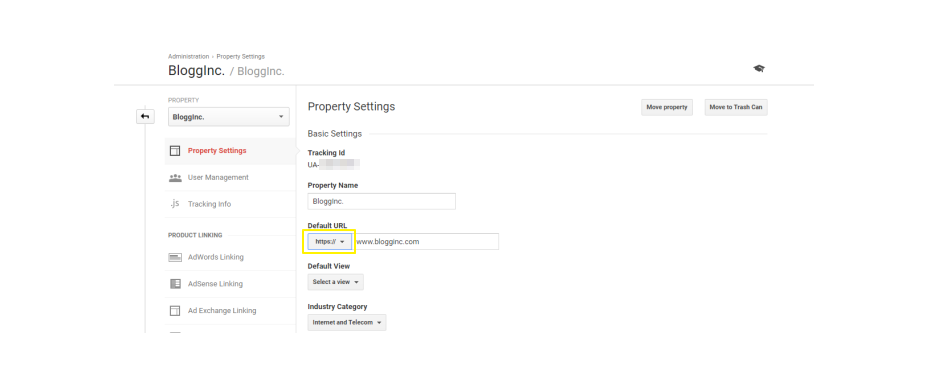
Click the Save button at the bottom of the page to save changes and continue.
Conclusion
Installing an SSL certificate on your WordPress website allows visitors to interact with your site over a secure, encrypted connection. And now that Let’s Encrypt offers free, automated SSL certificates to everyone and you have a handy guide to help you install it to your website; you should have practically no reason not to make the switch.
Here’s a quick recap of the main steps you need to follow to install a free SSL certificate on your WordPress website:
- Log in to your cPanel hosting account and install the free Let’s Encrypt SSL certificate.
- Update your website’s URLs either manually or by using the Really Simple SSL plugin.
- Head over to your Google Analytics account and change the URL prefix from http:// to https://.