So you have WordPress installed and now you are ready to install a theme to give your blog/site the look you want.
For most people, this involves using a theme that was purchased or using a free theme that they found on the Internet.
But these don’t have to be the only two options you have to choose from.
A developer with some skill in CSS and HTML can easily create their own WordPress themes to give their site the ability to provide a unique experience for their visitors. This tutorial will walk you through the steps of creating your own theme.
Understanding How Themes Work
Before we can roll up our sleeves and start designing a theme we have to understand how they work when it comes to WordPress. First you need to understand that there is a difference between themes and templates when it comes to WordPress. The template file is one or more sets of codes that your theme will call upon. Templates, like sidebar.php, header.php, index.php, etc., are called upon by the theme. The theme is the collection of template files, images, etc. that tells the visitor’s browser how your page(s) will look.
Your theme can consist of the following template files, however only the style.css and index.php files are required:
- style.css
- rtl.css
- index.php
- comments.php
- front-page.php
- home.php
- single.php
- single-<post-type>.php
- page.php
- category.php
- tag.php
- taxonomy.php
- author.php
- date.php
- archive.php
- search.php
- attachment.php
- image.php
- 404.php
Step 1 – Setting the Layout Of Your Theme
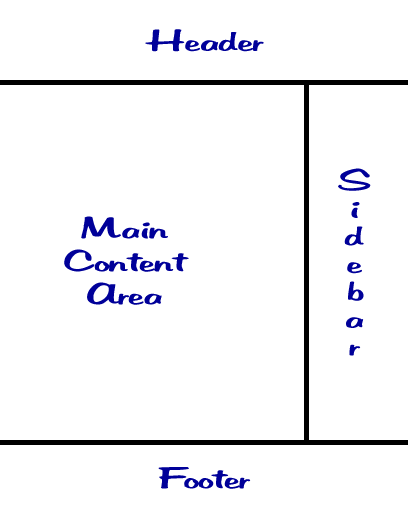
For our theme we are going to use a pretty basic layout consisting of a header, a footer, the main content area and a sidebar.
To create this you will need to open a text editor.
If you are using a tool like Dreamweaver to create your theme then set it on the Code view for now. You can also use a basic text editor like Notepad, eMacs or TextMate.
Now that your text editor of choice is open, type the following lines of code and save it as index.html.
<html>
<head>
     <title>Our Very Own WordPress Theme</title>
</head>
     <body>
       <div id="wrapper">
          <div id="header">
             header
          </div> <!-- close header -->

       <div id="content">

          <div id="main">
             main
          </div> <!-- close main content area-->

          <div id="sidebar">
             sidebar
          </div> <!-- close sidebar -->
        </div> <!-- close complete content -->

          <div id="footer">
             footer
          </div> <!-- close footer -->
       </div> <!-- close wrapper -->
     </body>
</html>
Notice that in the body of the HTML file we are using div ids to layout our theme. Next, we will create the individual template files for each.
Step 2 – Create the Template Files
The first file we are going to create is the index.php file.
Open up your text editor and create a new file called index.php where you will enter the following code:
<?php get_header(); ?>
<div id="main">
<div id="content">
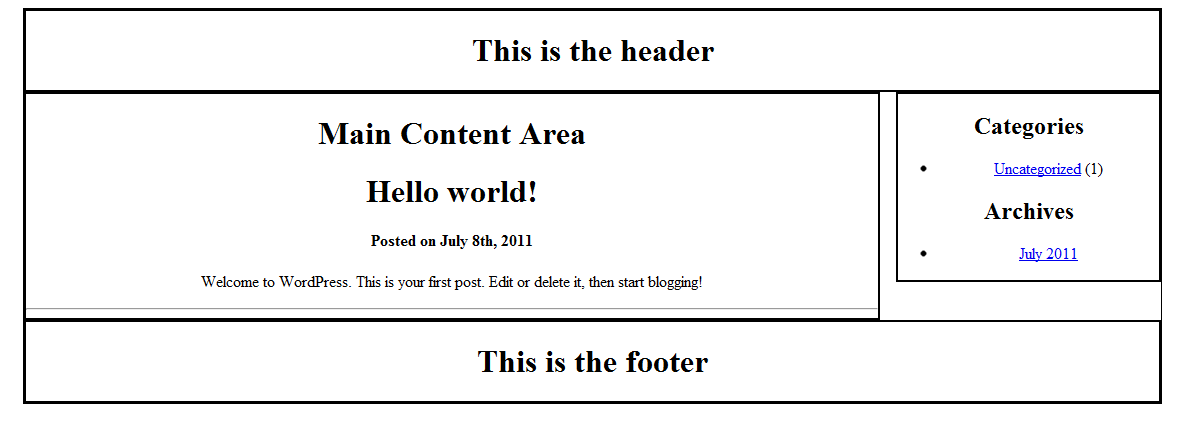
<h1>Main Content Area</h1>
<?php if (have_posts()) : while (have_posts()) : the_post(); ?>
<h1><?php the_title(); ?></h1>
<h4>Posted on <?php the_time('F jS, Y') ?></h4>
<p><?php the_content(__('(more...)')); ?></p>
<hr>
<?php endwhile; else: ?>
<p><?php _e('Sorry, we couldn’t find the post you are looking for.'); ?></p>
<?php endif; ?>
</div>
<?php get_sidebar(); ?>
</div>
<div id="delimiter"></div>
<?php get_footer(); ?>Now you can make some changes here if you want. Specifically, the text that reads Main Content Area between the <h1> tags and the text that reads Posted on after the <h4> tag can be customized to something that you would rather see on your blog. You can also change this later if you want, and since these are template files, the changes will be reflected across your entire blog.
WordPress’ internal functions will read this file and understand that the theme is telling them to go out and grab the files required for your page to look right. This link will take you to the WordPress Codex page that describes the functions in much greater detail.
Now we can create the other php files required.
The Header File
<html>
<head>
<title>My Theme</title>
<link rel="stylesheet" href="<?php bloginfo('stylesheet_url'); ?>">
</head>
<body>
<div id="wrapper">
<div id="header">
<h1>This is the header</h1>
</div>
The Footer File
<div id="footer">
<h1>This is the footer</h1>
</div>

</div>
< ?php wp_footer(); ? >
</body>
</html>
The Sidebar File
<div id="sidebar">
<h2 class="sidebartitle"><?php _e('Categories'); ?></h2>
<ul>
<?php wp_list_cats('sort_column=name&optioncount=1&hierarchical=0'); ?>
</ul>

<h2 class="sidebartitle"><?php _e('Archives'); ?></h2>
<ul class="list-archives">
<?php wp_get_archives('type=monthly'); ?>
</ul>
</div>
Now the sidebar will go ahead and grab the Categories and display them as well as the Archives that will be displayed monthly.
Where is the Main.php file?
No, I didn’t forget a part. The main content area will be populated with the blog posts themselves so we won’t be creating a main.php. We do need to create a style.css file though. So let’s do that.
body {
    text-align: center;
}

#wrapper {
    display: block;
    border: 1px #000 solid;
    width:90%;
    margin:0px auto;
}

#header {
    border: 2px #000 solid;
}

#content {
    width: 75%;
    border: 2px #000 solid;
    float: left;
}

#sidebar {
    width: 23%;
    border: 2px #000 solid;
    float: right;
}

#delimiter {
    clear: both;
}

#footer {
    border: 2px #000 solid;
}

.title {
    font-size: 11pt;
    font-family: arial;
    font-weight: bold;
}
Now when you upload everything to your test site and activate the theme you should see the following:
Of course, we wouldn’t expect this to be the finished product on your blog. In the next part of this series we will look at adding a logo and some other elements to dress up your new theme.