Websites created with static site generators like Jekyll or Hugo are on the rise. Their popularity is not surprising. They’re fast and secure, as there’s no data on the server side. The web server builds and serves web pages on the fly. You don’t have to worry about databases and server-side security.
You can write your posts in Markdown or HTML that gets rendered nicely with the help of templating engines (Jekyll uses Liquid, while Hugo uses Go Templates). Everything is fine until you want to add dynamic functionality to your static site, such as a Contact form. But, you don’t have to worry, as you can use an external backend like Google Forms to implement such features.
Use Google Forms to Embed a Contact Form
Incoming data collected by forms need to be processed by a server and stored in a database. You can find many online tutorials that recommend Formspree as a free form backend for static websites. However, the free version of Formspree sometimes bumps into issues like not forwarding form submissions to your email address. As an alternative, you can use Google Forms to add custom forms to your Jekyll, Hugo, or another static site.
In this guide, we’ll show you how to create and add a Contact form to a static HTML page (that you can later convert to a Jekyll or Hugo template). However, Google Forms is not limited to Contact forms; you can create any kind of custom forms or surveys with it. Your users won’t even know that you’re using Google Forms, as the form you create can be completely integrated with your site’s design!

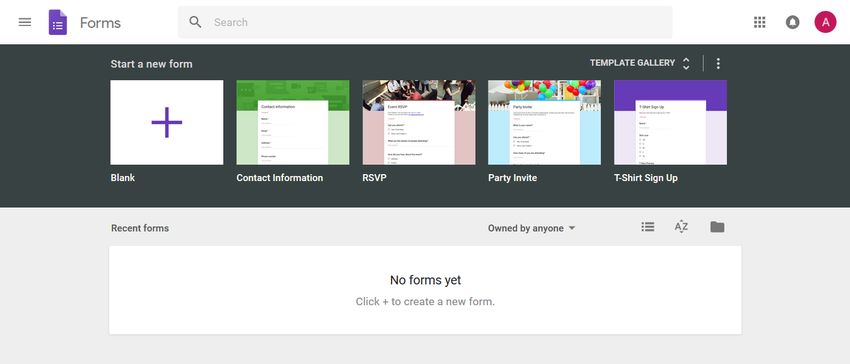
1. Create a New Form on Google’s Platform
Sign in to the Google Forms platform with your Google account. You can either start a new form from scratch or use Google’s pre-made templates. As Google has a fairly good Contact form template, we’ll use that rather than starting with a blank template.
Click the template called “Contact Information” in the Template Gallery on top of the page.
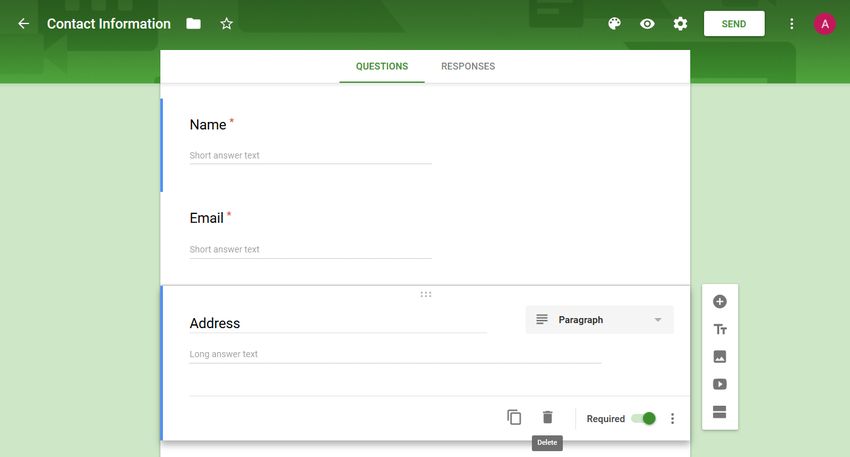
The default “Contact information” template has three required fields (Name, Email, Address) and two optional ones (Phone number, Comments). We’ll keep Name and Email but replace the rest with an optional Subject and a required Message field.
You can delete any field you don’t want to use by clicking the little recycle bin icon that shows up after you click on the field.
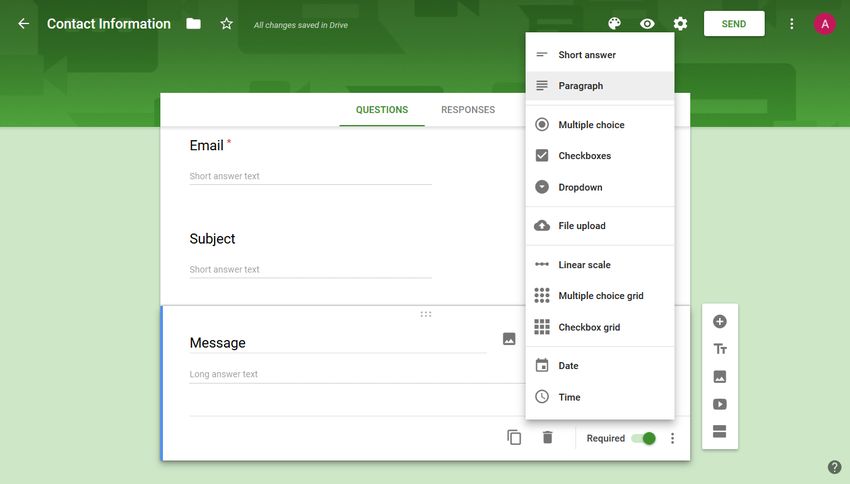
Then, you can add the new input fields by clicking the + icon in the floating menu on the right. You can choose from various input types such as short answer, checkbox, dropdown, paragraph, file upload, and others.
For our custom Subject field, we use the short answer input type. For Message, we choose paragraph as input type, that allows users to enter a multi-line message. We also set the latter to required using the little switcher at the bottom of the input box.
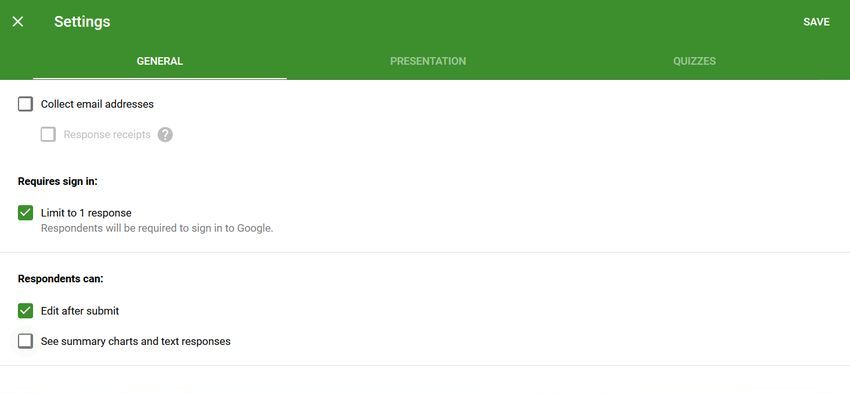
By default, Google Forms require respondents to sign into their Google accounts before they fill in the form. However, we don’t want this behavior when we embed the form into our website. So, click the gear icon next to the Send button on the top of the page to access the Settings and uncheck the “Limit to 1 response” option.
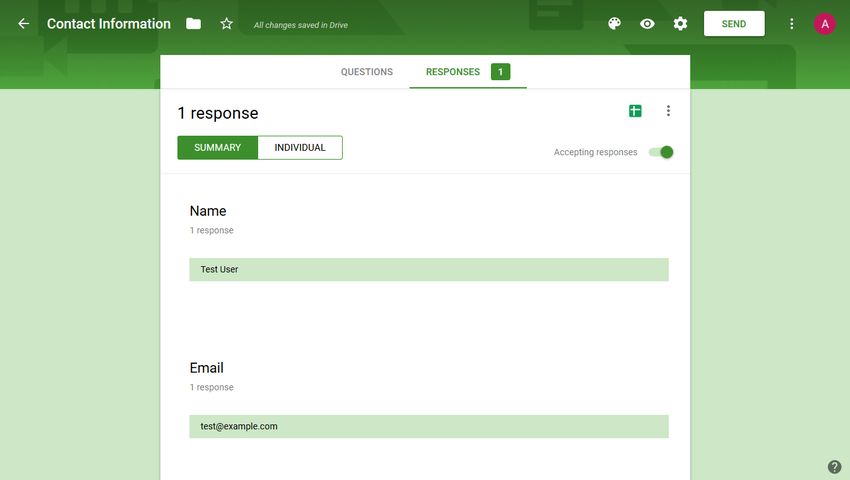
Save your settings and your Google Form is done. You can test it by copying-pasting the URL into another browser where you are not logged into your Google Account. Here, you can fill in the form with test data.
Your test message will show up in the Responses tab where you can decide what to do with each response (download, print, delete, etc.).
2. Create a Similar Form on Your Own Site
Now, you need to mirror the Google Form you created in the previous step so that it can forward data from your website to the Google backend. Create a basic HTML form with the same form fields: Name, Email, Subject, and Message.
<form action="" method="post">
      <label>Name*</label>
      <input type="text" placeholder="Name*" name="" required>

      <label>Email Address*</label>
      <input type="email" placeholder="Email address*" name="" required>

      <label>Subject</label>
      <input type="text" placeholder="Subject" name="">

      <label>Message*</label>
      <textarea rows="5" placeholder="Message*" name="" required></textarea>

      <button type="submit">Send</button>
</form>
The HTML doesn’t have to be exactly the same as Google’s, but it needs to have exactly the same form fields. You can add your own CSS classes to the form so that it’ll match your site’s design.
It’ll be the name and action fields that will tie your on-site form to the Google backend.
3. Add name and action Values to Your On-site Form
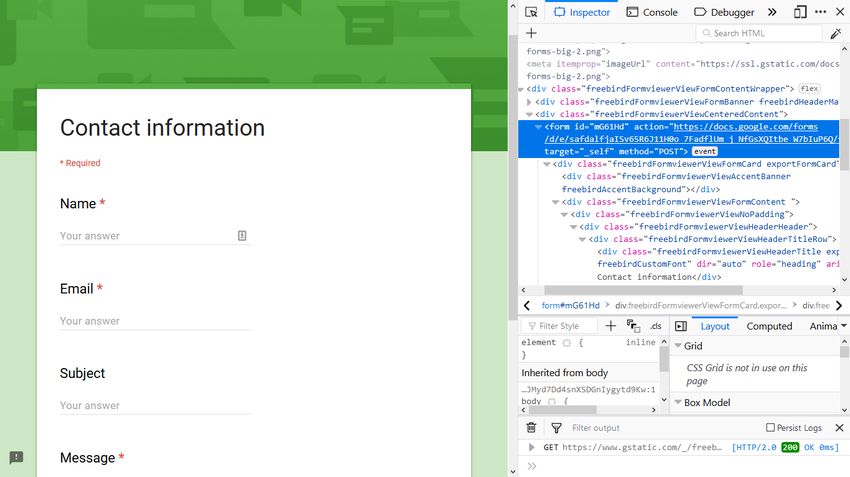
Google uses custom name and action values to identify each form. The action attribute belongs to the <form> tag, while the name attributes belong to the input fields. So, you need to find these custom values and add it to the HTML.
Log out of Google (or use a different browser), as if you stay logged in it’ll be hard to do the code inspection (Google adds a lot of extra stuff to logged-in users). Load your Google Form using the form’s URL and inspect it using your browser’s developer tools. In Firefox, you can do that by right-clicking the form and clicking the “Inspect Element” option. In Chrome, you need to choose the “Inspect” option after right-clicking the element.
You need to find the <form> tag in the HTML inspector and copy the value of the action attribute into your custom HTML.
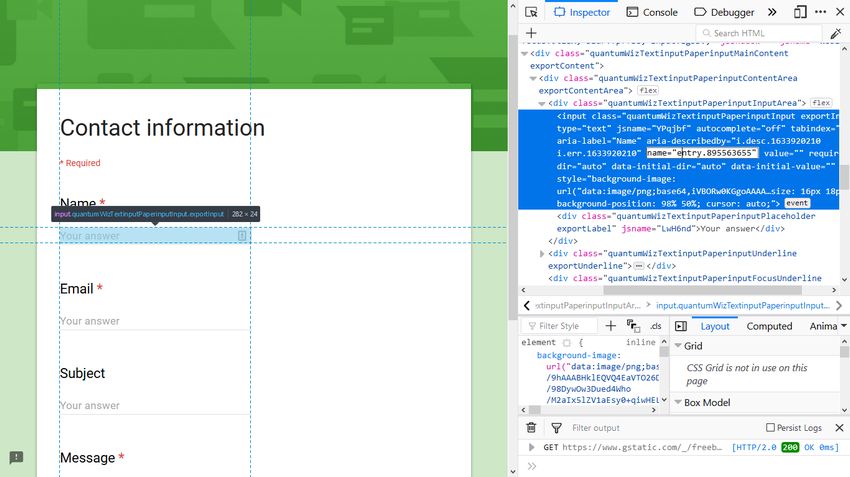
You need to do the same thing with your four input fields, too. But now, you don’t have to copy the action attribute but the name attribute of each input field.
Insert the custom action and name values into your HTML:
<form action="https://docs.google.com/forms/d/e/safdalfjaISv65R6J11H0o_7FadflUm/formResponse" method="post">
<label>Name*</label>
<input type="text" placeholder="Name*" name="entry.895563655" required>
<label>Email Address*</label>
<input type="email" placeholder="Email address*" name="entry.772189125" required>
<label>Subject</label>
<input type="text" placeholder="Subject" name="entry.203645991">
<label>Message*</label>
<textarea rows="5" placeholder="Message*" name="entry.190021963" required></textarea>
<button type="submit">Send</button>
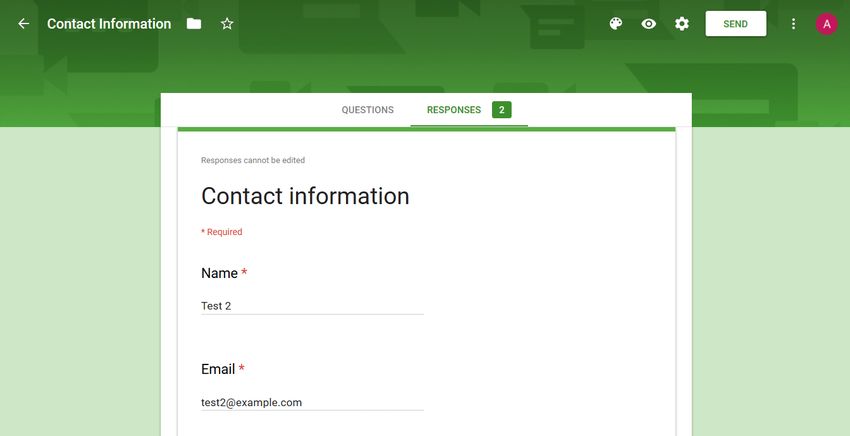
</form>Now, your on-site form is bound to the Google backend. You can test it by entering some test data into your form. Sign back to Google Forms and check if your test response has arrived.
4. Redirect to a Custom Thank You Page
While doing the test, you’ve surely noticed that your site has redirected the user to Google’s default thank you page. If you’d rather send your respondents to your custom thank you page add the following code to the top of your form, right before the <form> tag:
<script type="text/javascript">var submitted=false;</script>
<iframe name="hidden_iframe" id="hidden_iframe" style="display:none;"
onload="if(submitted) {window.location='thankyou.html';}"></iframe>

<form action="https://docs.google.com/forms/d/e/safdalfjaISv65R6J11H0o_7FadflUm/formResponse"
method="post" target="hidden_iframe" onsubmit="submitted=true;">
...
</form>
You need to add the path to your custom thank you page as a value of the window.location() property (it’s ‘thankyou.html’ in the example above).
Note that you also have to add the target=”hidden_iframe” and onsubmit=”submitted=true;” attributes to the <form> tag.
5. Configure Your Form Settings
You can further adjust your form settings to better manage your incoming responses. For example, you can get email notifications for each new submission.
Navigate to the Responses tab, click the three-dot icon, and check the “Get email notifications for new responses” option. It will send an email notification to the email tied to your Google account (usually a Gmail address) whenever a new respondent submits your Contact form.
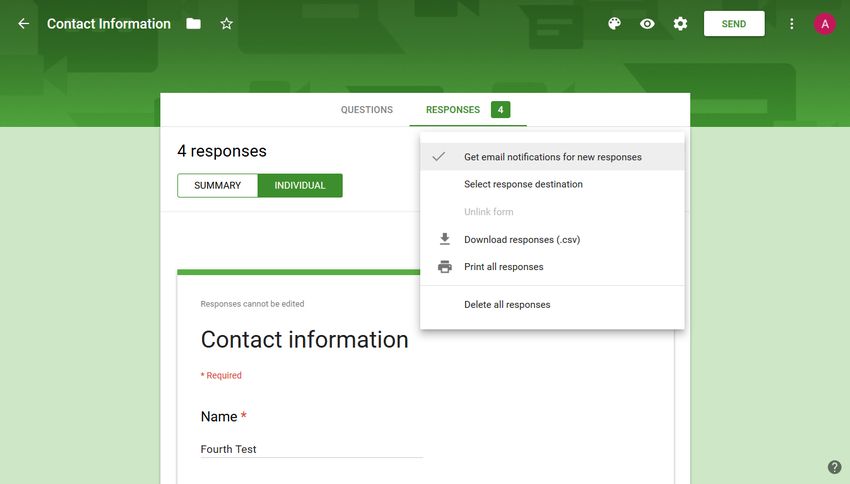
You can also collect your responses in a Google Spreadsheet. To do so, select the “Select response destination” and specify the spreadsheet that should collect the data (or create a new one). You can download the responses as a .csv file or print them with a click, too.
Wrapping Up
Static websites are excellent for anyone who needs a simple web presence but doesn’t want to use a CMS like WordPress or pay for hosting. With external backends, you can also add dynamic features to your static site.
Google Forms provide you with a free solution to embed a custom Contact form to your website. If you want to take a step further in form building, read our tips on how to build better Contact forms, too. And, if you’d rather stick to dynamic sites, don’t miss out our guide on how to increase server security, either.