For the last few years I’ve run my own Subversion (SVN) server on either a spare box and more recently with a paid for server. This was mainly because my work was private and I was familiar with SVN, and I found that the TortoiseSVN client was excellent and easy to use. My needs have changed and evolved over the years, particularly in the last few months since I started these tutorials. So I have decided to start moving new projects and some of my tutorials to GitHub.

I’ve been watching GitHub progress over the last few years and it really has become a bit of a phenomenon. With their recent funding round they raised €100 million, that’s an incredible figure and really goes to show that they have big plans. For me in particular, I’ll be making use of the free repositories to host my future tutorial source code. I hope that this way I’ll be able to interact with the community better as a whole and see what people are actually using my code samples for.
This is the last in my series of OAuth2 tutorials, so if you’re just joining me it will be borrowing from my previous OAuth 2.0 tutorials. Each site (Twitter, LinkedIn and now GitHub) has implemented their OAuth2 authentication process slightly differently, using different methods or types of OAuth. You should now be able to navigate pretty much any OAuth2 implementation you come across. If you do find you’re having difficulty with anything, please feel free to comment or email me.
This time we will create a simple plug-in that provides basic information about you and lists your repositories and how many Forks and Watchers each one has. Think of it as a kind of GitHub business card, in fact if you combined it with my previous LinkedIn tutorial you would have a pretty comprehensive way of displaying your CV and work.
Registering and Creating your first GitHub Application
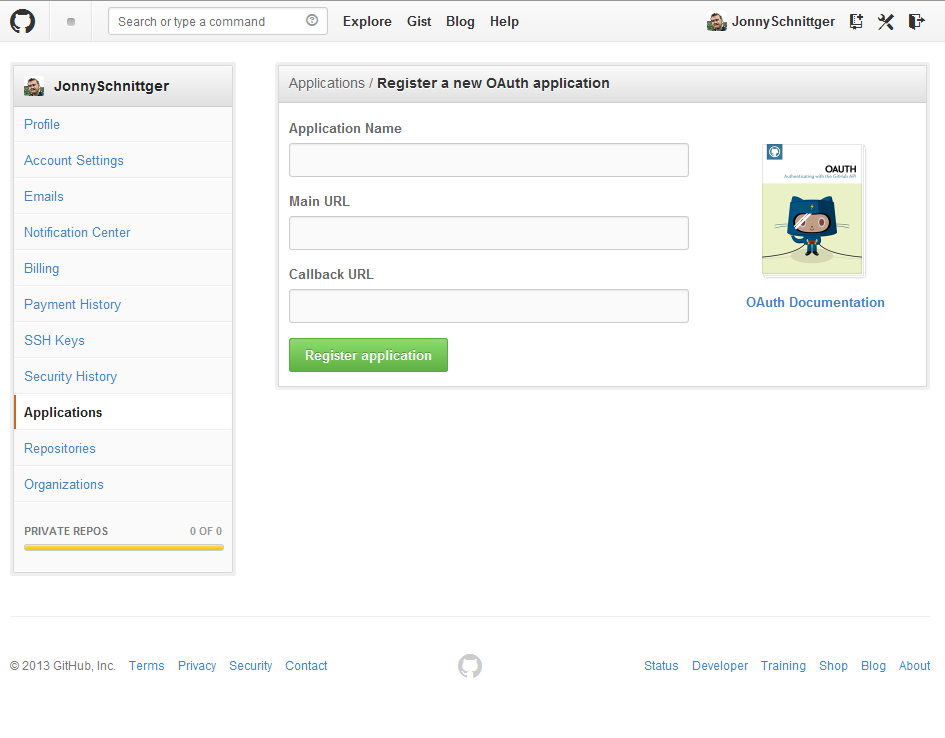
To actually authenticate against GitHub, you will need to register your application here. If you don’t already have an account, you can sign up for free. The callback URL will be the to our github.php file, it should looks something like this
http://yoursite.com/wordpress/wp-admin/options-general.php?page=github.php
Getting Started
First up we’ll need to create our OAuth template class. This is the same pattern we’ve been following for the previous OAuth2 tutorials, so we can jump start the process quickly. This template defines all of the methods we’ll be using and I’ll go through each one in detail below.
<?php
class GitHub_Example {

    public function __construct() {
    }

    public function add_github_admin_menu() {
    }

    public function add_github_admin_page() {
    }

    public function render_shortcode($atts) {
    }

    public function enqueue_github_style() {
    }
}
$github = new GitHub_Example();

?>
The Constructor
The GitHub_Example class has two possible uses in this tutorial. The first is to setup and configure WordPress for the plug-in, and the second is to allow us parse the OAuth code when we are redirected back from github.com after authentication.
For now we’ll just deal with setting up the plug-in. To do this we need to register our shortcode using add_shortcode, add our menu function and queue up our CSS using add_action.
public function __construct() {
    add_shortcode('github', array($this, 'render_shortcode'));
    add_action('admin_menu', array($this, 'add_github_admin_menu'));
    add_action('wp_footer', array($this, 'enqueue_github_style'));
}
Adding the menu
To actually add the menu we use the add_options_page, we also queue up our CSS function here for use in the admin section.
public function add_github_admin_menu() {
    add_options_page('GitHub Options', 'GitHub', 'manage_options', 'github.php', array($this, 'add_github_admin_page'));
    add_action( 'admin_print_scripts', array($this, 'enqueue_github_style'));
}
Adding the settings page
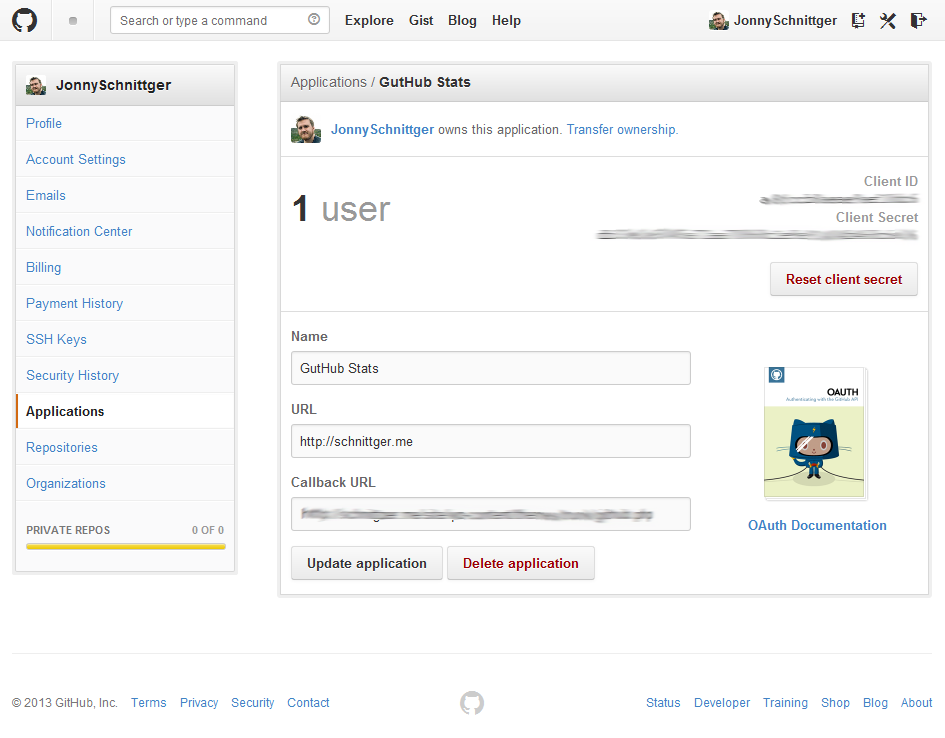
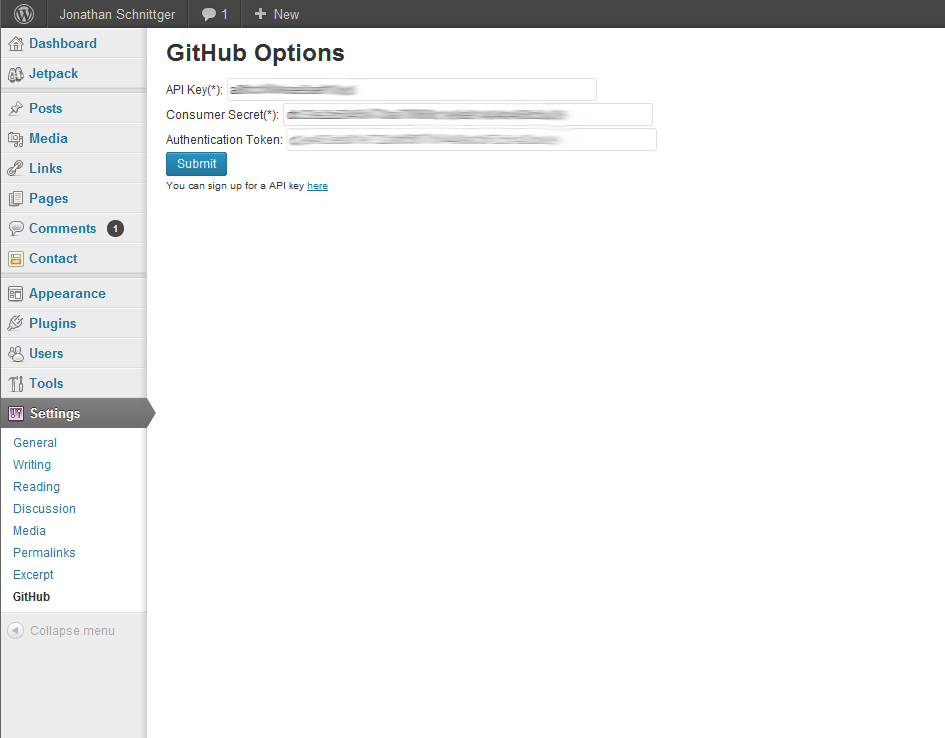
To actually authenticate against GitHub, we’ll need to store the client id and secret we created earlier.
To do this we will use our usual form that posts back to itself and our conditional Authenticate button. The URL to authenticate on GitHub is ”
https://github.com/login/oauth/authorize?client_id=$api_key&scope=&state=$state&redirect_uri=$redirect”. Once again the state is the base64 encoded current time. This is also where the GitHub OAuth implementation starts to be different. We don’t have to specify the token type here, it will always default to bearer token.
public function add_github_admin_page() {
    if ( !current_user_can( 'manage_options' ) )  {
        wp_die( __( 'You do not have sufficient permissions to access this page.' ) );
    }

    if ( $_SERVER["REQUEST_METHOD"] == "POST" ){
        update_option( 'GITHUB_API_KEY', $_POST['api_key'] );
        update_option( 'GITHUB_API_SECRET_KEY', $_POST['api_secret_key'] );
    }

    ?>
    <div class="github-admin-options">
        <h1>GitHub Options</h1>
        <form name="options" method="POST" action="<?php echo $_SERVER['REQUEST_URI']; ?>">
            <label for="api_key">API Key<span class="required">(*)</span>: </label>
            <input type="text" name="api_key" value="<?php echo get_option( 'GITHUB_API_KEY', '' ); ?>" size="70">
            <br />
            <label for="api_secret_key">Consumer Secret<span class="required">(*)</span>: </label>
            <input type="text" name="api_secret_key" value="<?php echo get_option( 'GITHUB_API_SECRET_KEY', '' ); ?>" size="70">
            <br />
            <label for="bearer_token">Authentication Token: </label>
            <input type="text" disabled value="<?php echo get_option( 'GITHUB_AUTHENTICATION_TOKEN', '' ); ?>" size="70">
            <br />
            <input class="button-primary" type="submit" name="save" />

            <?php

            $state = base64_encode(time());
            $redirect = get_template_directory_uri() . '/github.php';
            $api_key = get_option( 'GITHUB_API_KEY' );
            $api_secret = get_option( 'GITHUB_API_SECRET_KEY' );
            $token = get_option( 'GITHUB_AUTHENTICATION_TOKEN' );

            if($api_key && $api_secret && !$token) {
                $api_url = "https://github.com/login/oauth/authorize?client_id=$api_key&scope=&state=$state&∓redirect_uri=$redirect";
                ?>
                <a class="button-primary" type="button" href="<?php echo $api_url; ?>">Authenticate</a>
                <?php
            }

            ?>
            <br/>
            <small>You can sign up for a API key <a href="https://developer.github.com/" target="_blank">here</a></small>
        </form>
        <br />
        <?php echo do_shortcode('[github]'); ?>
    </div>
    <?php
}
Now that we can save our client id and secret, we have to complete the authentication steps.
Back to the Constructor!
Now we can complete our constructor and finalize our authentication. The first step we do is check to see if the REQUEST_METHOD in the $_SERVER variable is set to GET and then confirm that the code parameter has been passed to use in the $_GET variable. If they are we know we are not running inside WordPress and we can include and required files and then proceed with the Authentication.
Here we come across another difference between the OAuth implementations we have seen. You can actually configure the response type for the access_token response. We do this using the headers argument value for wp_remote_post. All we have to do is initialize the array and set the Accept value to ‘application/json’. We can make a POST request to the access_token URL at ‘https://github.com/login/oauth/access_token’. Once we have our response we parse and update our settings and then exit.
public function __construct() {
    if ( $_SERVER["REQUEST_METHOD"] == "GET" && isset($_GET['code'])){

        require_once('../../../wp-config.php');
        require_once(ABSPATH . 'wp-includes/plugin.php');
        require_once(ABSPATH . 'wp-includes/pluggable.php');
        require_once(ABSPATH . 'wp-includes/general-template.php');

        $redirect = get_template_directory_uri() . '/github.php';
        $api_key = get_option( 'GITHUB_API_KEY' );
        $api_secret = get_option( 'GITHUB_API_SECRET_KEY' );

        $args = array(
            'method' => 'POST',
            'httpversion' => '1.1',
            'blocking' => true,
            'headers' => array(
                'Accept' => 'application/json'
            ),
            'body' => array(
                'code' => $_GET['code'],
                'redirect_uri' => $redirect,
                'client_id' => $api_key,
                'client_secret' => $api_secret
            )
        );

        add_filter('https_ssl_verify', '__return_false');
        $response = wp_remote_post( 'https://github.com/login/oauth/access_token', $args );

        $keys = json_decode($response['body']);

        if($keys) {
            update_option( 'GITHUB_AUTHENTICATION_TOKEN', $keys->{'access_token'} );
        }
        wp_redirect( get_bloginfo( 'url' ) . '/wp-admin/options-general.php?page=github.php' );
        exit;
    }

    add_shortcode('github', array($this, 'render_shortcode'));
    add_action('admin_menu', array($this, 'add_github_admin_menu'));
    add_action('wp_footer', array($this, 'enqueue_github_style'));
}
Rendering our Shortcode
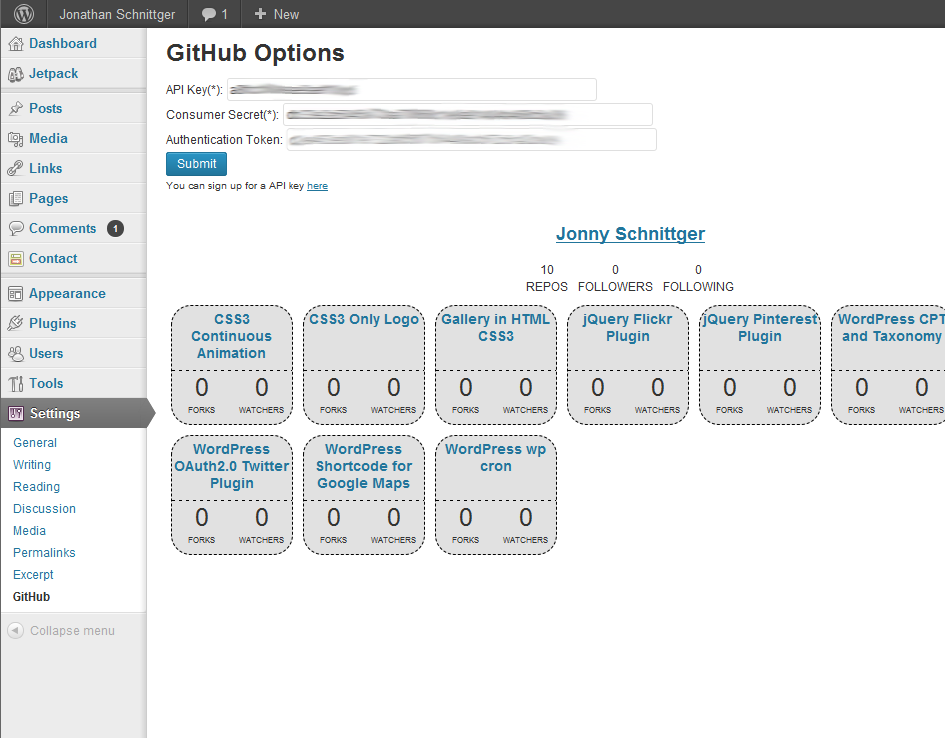
To actually get all of the information we need for our shortcode, we’ll have to make two separate requests to the API. The first will be to get basic user information (https://api.github.com/user) and the second will be to get the list of repositories (https://api.github.com/user/repos). Like all modern APIs the content returned is JSON formatted, so it’s very easy to parse out the information we need. First up it’s out user information. Here we’re going to grab the user name, URL and bio, along with the counts for their public repositories, followers and how many people they are following
add_filter('https_ssl_verify', '__return_false');

$api_url = "https://api.github.com/user?access_token=$token";
$response = wp_remote_get( $api_url );
$json = json_decode( $response['body'] );

$return .= '<div class="github">';
$return .= '<h2><a href="' . $json->{'html_url'} . '" target="_blank">' . $json->{'name'} . '</a></h2>';
$return .= '<div class="bio">';
$return .= '<span>' . $json->{'bio'} . '</span>';
$return .= '</div>';
$return .= '<div class="counts">';
$return .= '<div>' . $json->{'public_repos'} . '<br/><span>repos</span></div>';
$return .= '<div>' . $json->{'followers'} . '<br/><span>followers</span></div>';
$return .= '<div>' . $json->{'following'} . '<br/><span>following</span></div>';
$return .= '</div>';
Next up it’s the list of repositories and how many forks have been made and how many people are watching them. Each repository is returned, so we just need to loop through them and grab the values we are interested in.
$api_url = "https://api.github.com/user/repos?access_token=$token";
$response = wp_remote_get( $api_url );
$json = json_decode( $response['body'] );

$return .= '<ol class="repos">';
foreach($json as $i => $repos) {
    $return .= '<li>';
    $return .= '<h3><a href="' . $repos->{'html_url'} . '" target="_blank" title="' . $repos->{'description'} . '">' . str_replace('_', ' ', $repos->{'name'} ) . '</a></h3>';
    $return .= '<div>';
    $return .= '<div>';
    $return .= $repos->{'forks_count'};
    $return .= '<br/><span>forks</span>';
    $return .= '</div>';
    $return .= '<div>';
    $return .= $repos->{'watchers_count'};
    $return .= '<br/><span>watchers</span>';
    $return .= '</div>';
    $return .= '</div>';
    $return .= '</li>';
}
$return .= '</ol>';
$return .= '</div>';
You can see the full render_shortcode function in the source download
Styling
I’ve included some basic CSS classes in the above HTML and I’ve provided a sample layout for you to play with. The full CSS is below. All it does is center the User details and then show the repositories in-line. This way it will scale on smaller screens.
div.github h2{
    text-align: center;
}

div.github div.counts {
    text-transform: uppercase;
    text-align: center;
}

div.github div.counts div {
    display: inline-block;
    padding: 5px;
}

div.github ol.repos {
    list-style: none;
    margin: 0px;
    padding: 0px;
}

div.github ol.repos li{
    width: 120px;
    height: 120px;
    text-align: center;
    font-size: 12px;
    border: 1px dashed #000000;
    -webkit-border-radius: 20px;
    -moz-border-radius: 20px;
    border-radius: 20px;
    background-color: #e1e1e1;
    position: relative;
    display: inline-table;
    margin: 5px;
}

div.github ol.repos li h3{
    padding: 0px;
    margin: 5px 0px;
}

div.github ol.repos li a, div.github ol.repos li a:hover, div.github ol.repos li a:visited {
    text-align: center;
    text-decoration: none;
}

div.github ol.repos li > div{
    border-top: 1px dashed #000000;
    position: absolute;
    bottom: 5px;
    width: 100%;
}

div.github ol.repos li div div{
    display: inline-block;
    font-size: 25px;
    width: 50%;
    margin-top: 8px;
}

div.github ol.repos li div div span{
    font-size: 8px;
    text-transform: uppercase;
}
Please feel to grab/fork/comment on any of my repositories, it would be great to see what you do with them.
