For a popular content management system like WordPress, security is of paramount importance. Millions of people use WordPress to share information with people all over the world.
And since WordPress makes this so easy and gives you complete control over your content, there might be cases where you’d like to share your content with a select few people. Perhaps you want to share a wedding photography album with your guests or share selected articles with only your subscribers.
Whether you need to protect your whole website or restrict user access to specific content, you can take a DIY approach by following a few simple steps.
In this post we’ll show you how you can secure your WordPress website in four different ways. But before we begin, let’s take a look at why you might even consider password protecting content on your site in the first place.
Why Should You Consider Password Protecting Content on Your Website?
Whether you’re a website owner or run a small online store, there may come a time when you need to password protect certain content on your website. Let’s take a look at some of the main scenarios where you might consider restricting access to your WordPress website.
- Paid Privilege. If your website has a premium member’s only area, you can restrict its access to general users by password- protecting it. A lot of sites that sell premium online courses and classes have exclusive member’s areas on their websites which only premium members have access to.
- Private Sales. Having a private sales area may be appealing for painters (or auctioneers) and would want to restrict access to their artwork online. This is true for anyone who wants to showcase their work to potential buyers only.
- Sensitive Content. If you’re a blogger who occasionally writes articles or takes pictures that are not suitable for younger audiences, you may consider password protecting that particular content. And if there’s some content on your website that you’d like to share with a handful of people, you could hide it from the public by password protecting it.
Now that you have an idea of why you may need to password protect content on your WordPress website, let’s take a look at how you can do it.
How to Password Protect Content on Your WordPress Site
In this section, we’ll show you four different ways of password protecting content on your WordPress website based on which type of content you’d like to restrict access to. We’ll look at password protecting:
- A post (or page).
- Parts of a post (or page).
- A category of posts.
- Your entire website.
#1: To Password Protect a Post or Page
Whether you need to password protect a post or a page on your WordPress website, you can do so without installing any third-party plugins. WordPress packs some in-built functionality that allows you to control what information you share with your visitors.
For the purpose of this tutorial, we’ll show you how you can password protect a post though you can follow the same steps to password protect a page on your website, as well.
To get started, head over to Posts > All Posts from the WordPress dashboard and find the post you’d like to password protect. Open it up in the Edit Post screen.
From the Publish section in the right sidebar, click the Edit link next to Visibility: Public.
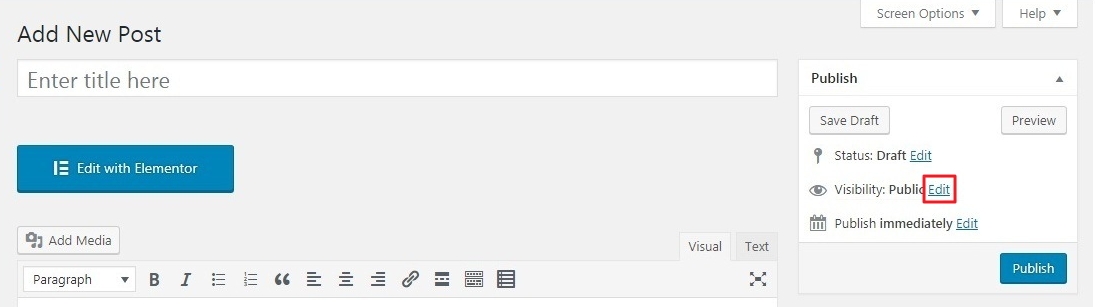
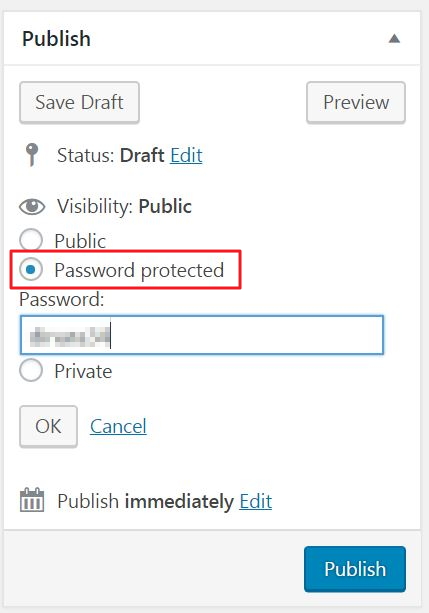
You should see three different options – Public, Password protected, and Private. Click on Password protected and enter a password. Once you’re done, click the OK button to proceed.
Once published (or updated), your post or page will look something like this:
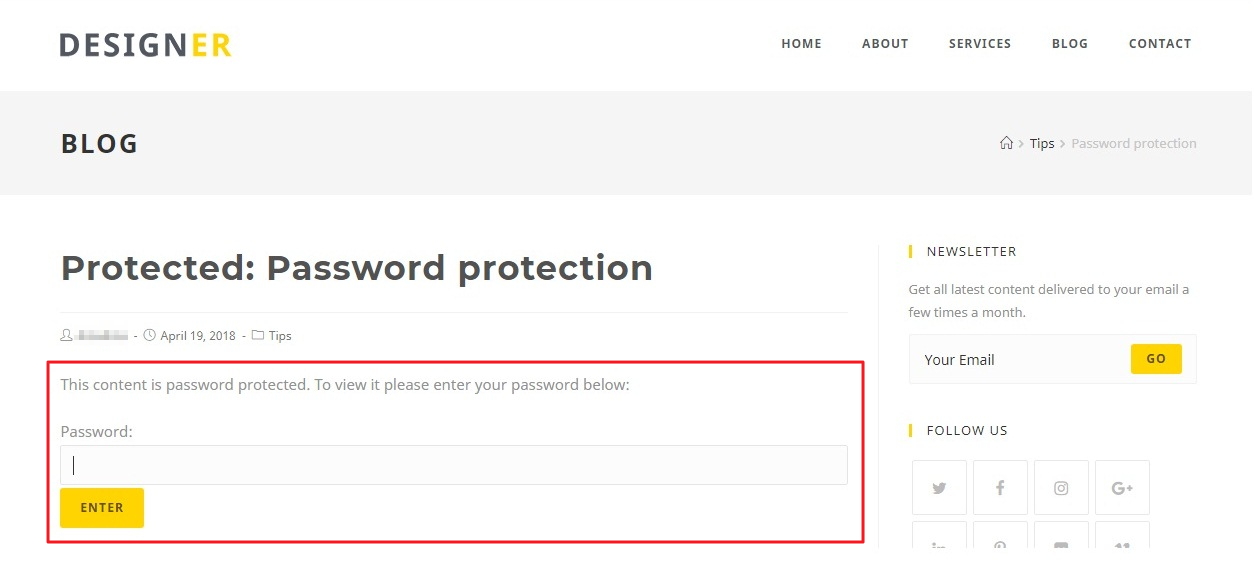
This post will now be visible only to users who enter the password you set.
#2: To Password Protect Parts of Your Post or Page
The simplest way to restrict user access to a portion of a post (or page) is by using the Passster plugin.

Once you have the plugin activated, all you have to do is put a shortcode before and after the content block you’d like to restrict access to. When someone views the post they will need to enter the password you set to view the password protected content.
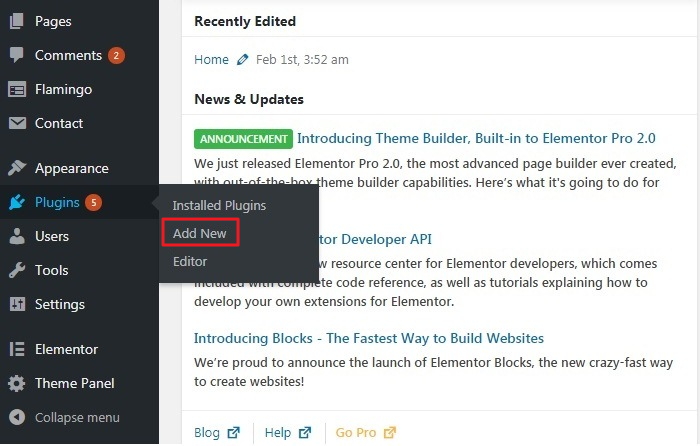
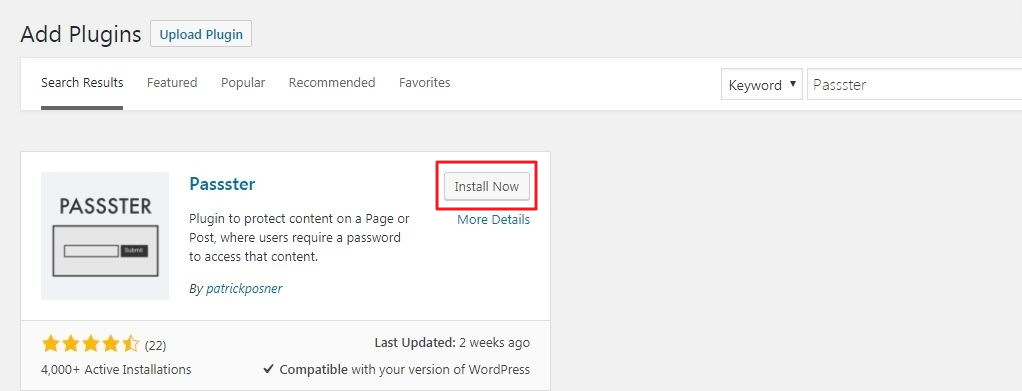
Log in to your WordPress website’s admin panel and head over to Plugins > Add New.
Next, search for the Passster plugin. Once it shows up in the search results, click on the Install Now button to install it to your website.
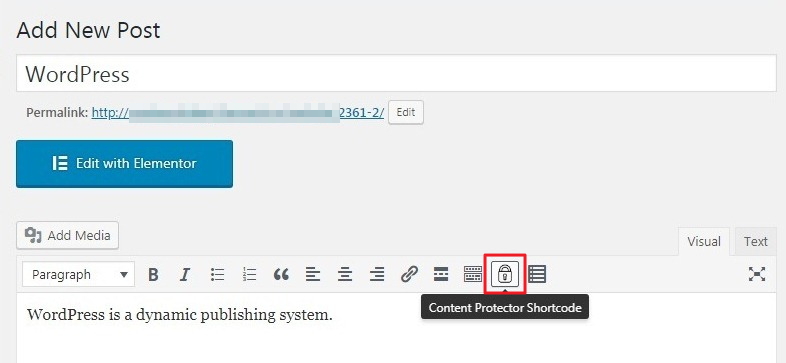
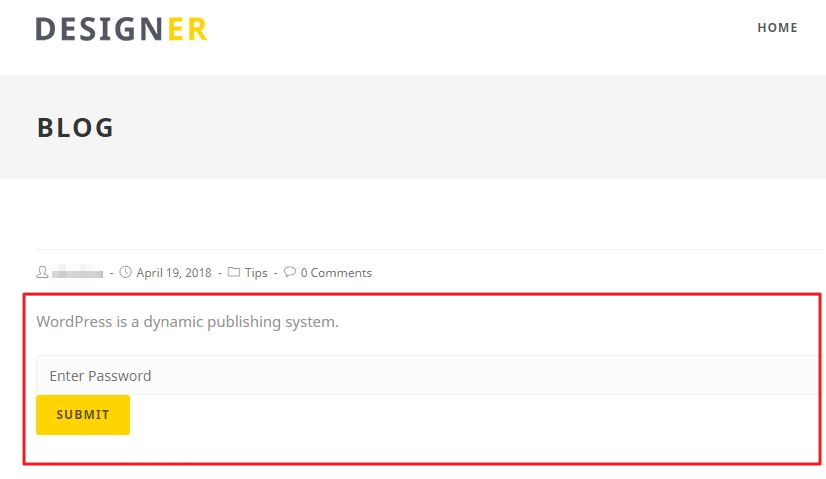
Once the plugin is done installing, click the Activate button. Now, open up the post that contains the content you’d like to password protect. Select the chunk of content you’d like to password protect and click on the Content Protector Shortcode option that’s added to the text editor.
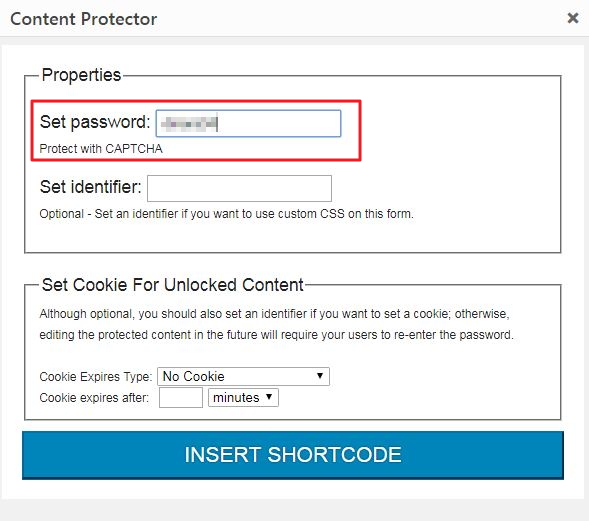
You should see a pop-up window prompting you to enter a password. Enter the password you’d like to use to restrict access to your content and click the INSERT SHORTCODE button to proceed.
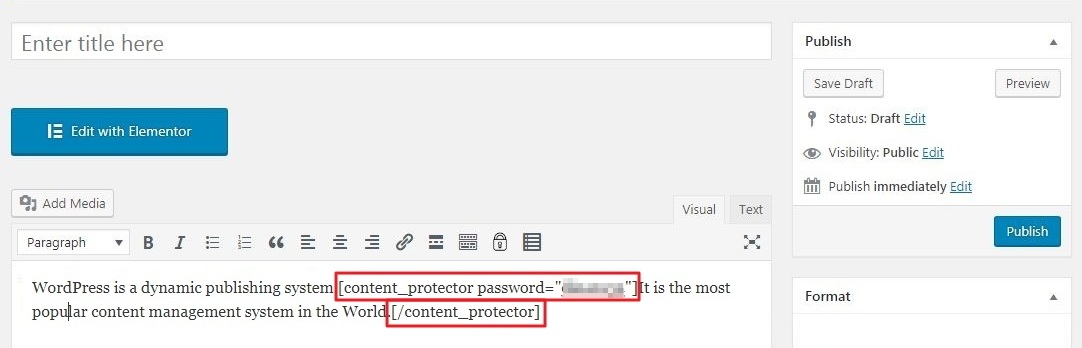
The chunk of content you selected should be wrapped around the shortcode and should look something like this:
[content_protector password=”your-password”]Your password protected content here.[/content_protector].
Once you’re done, be sure to click the Update (or Publish) button to save changes. This is how your content will appear to your readers on the front-end.
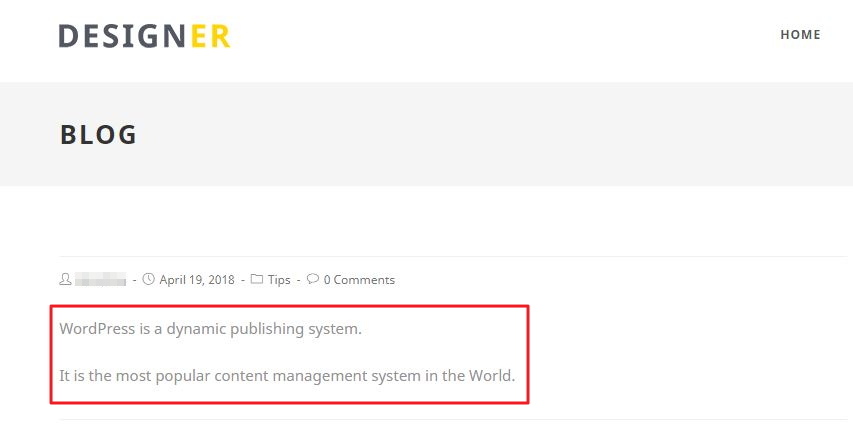
And after entering the correct password, your readers will be able to read through the restricted content.
#3: To Password Protect a Category of Posts
If you want to protect more than just a page or part of a post, you can use the Access Category Password plugin to restrict user access to a specific category of posts. And to get access to the entire category of posts, your readers will be asked to enter the password.
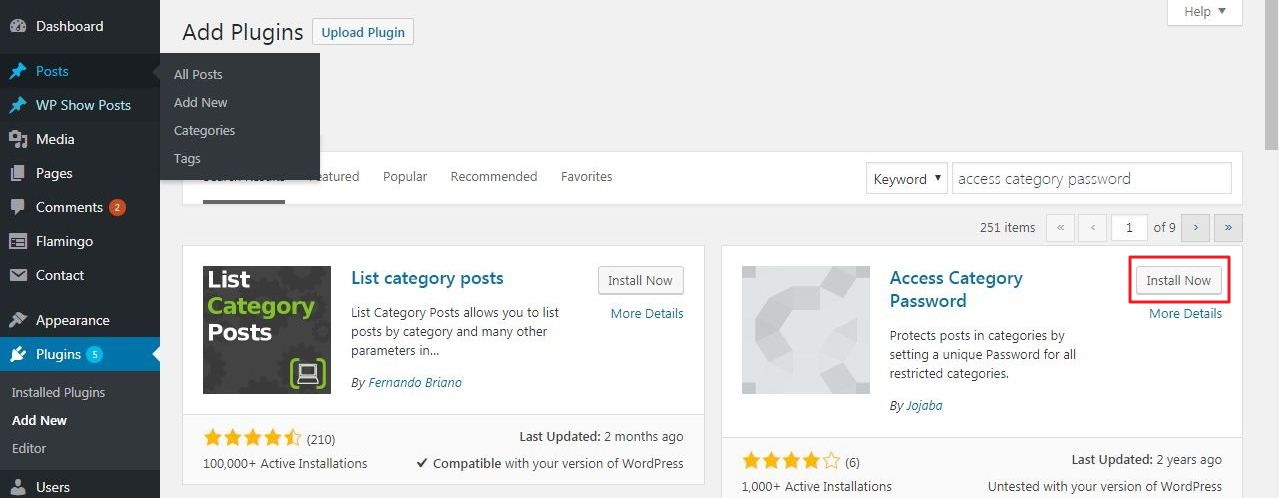
Start off by logging in to your WordPress website’s admin panel. Navigate to Plugins > Add New and search for the Access Category Password plugin. Once it shows up in the search results, click on the Install Now button to install it to your website.
Once the plugin is done installing, click the Activate button.
Next, hover over Settings in the sidebar menu, and click on the Access Category Password option in the sub-menu.
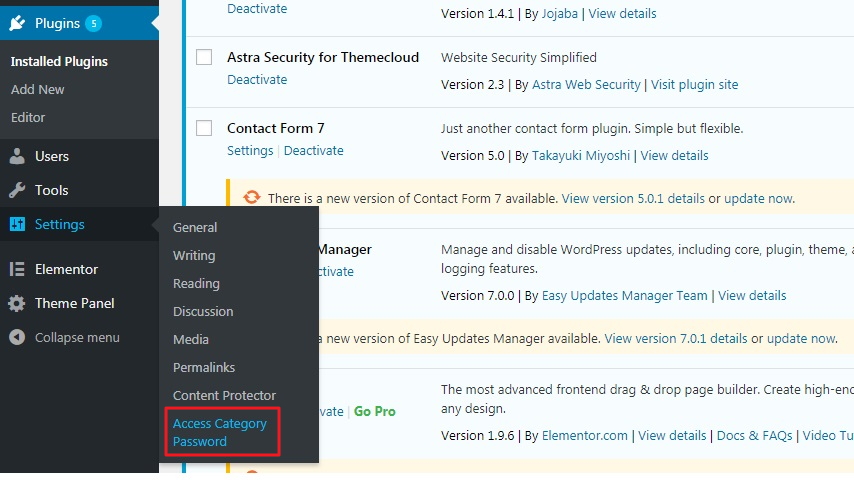
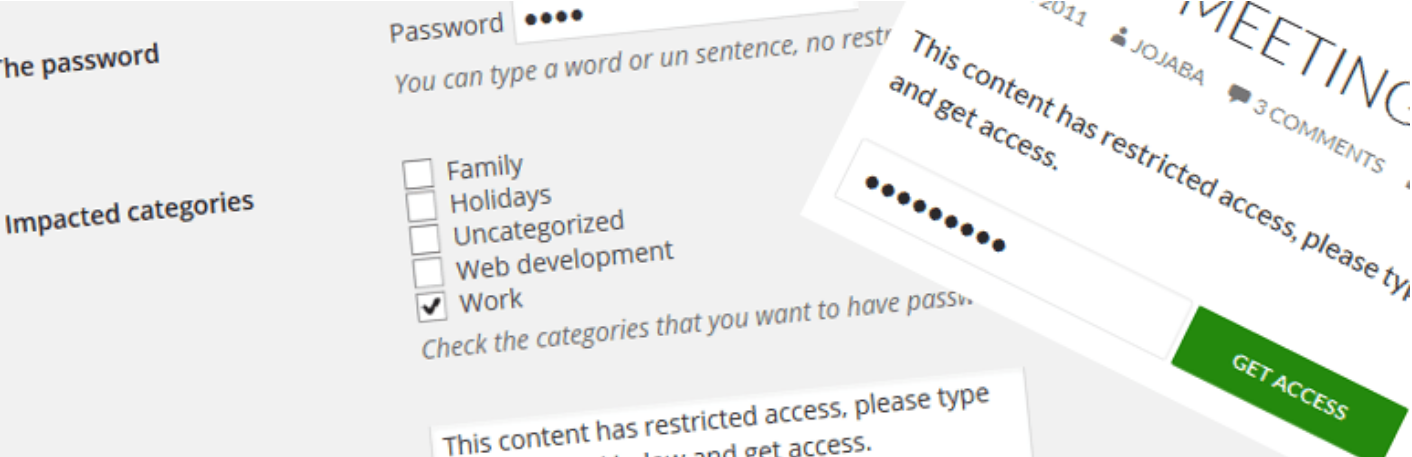
You should be redirected to the Access Category Password settings page. Enter your desired password and select which categories of posts you’d like to password protect using the Impacted categories option.
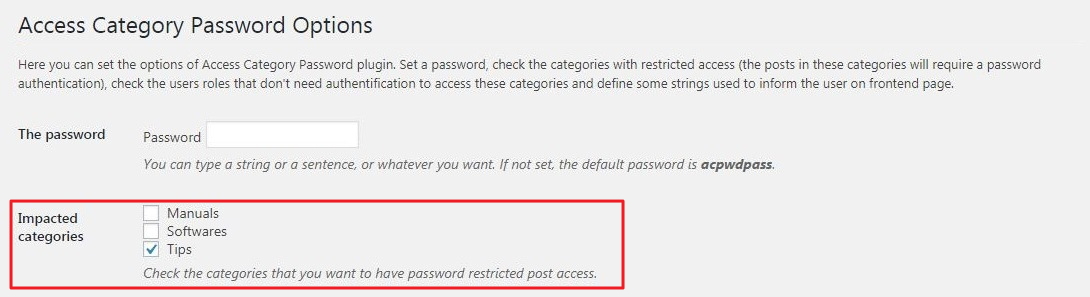
Optionally, you can use the Granting users option to select the user roles that do not need to enter the password to view the protected categories of posts as long as they’re signed in.
By default, only the administrator is granted access to password protected content.

That’s all there is to it. Once you save changes, the category of posts you selected should be password protected.
#4: To Password Protect Your Entire Site
If you need to password protect your entire WordPress site, you can do so using the Password Protected plugin for WordPress.

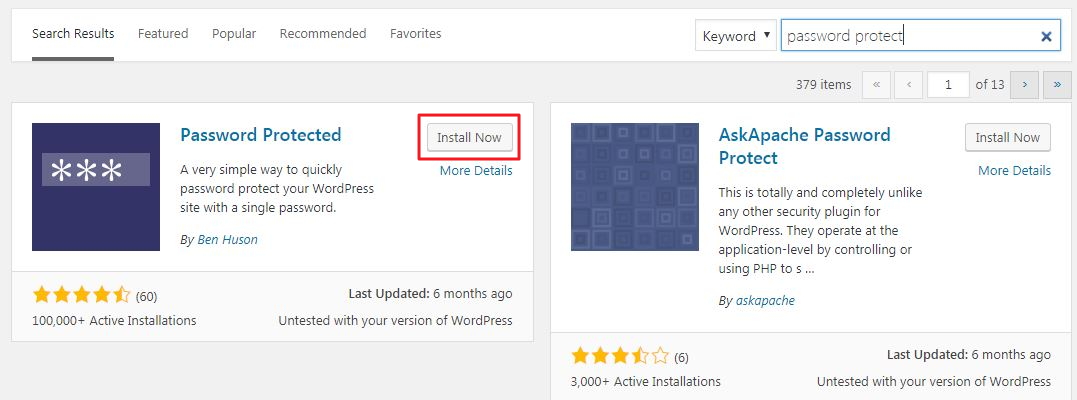
Log in to your WordPress website’s dashboard, navigate to Plugins > Add New and search for the Password Protected plugin. Once it shows up in the search results, click on the Install Now button to install it to your website.
Once the plugin is done installing, click the Activate button.
Once that’s done, head over to Settings and click Password Protected. You will be redirected to the Password Protected Settings page:
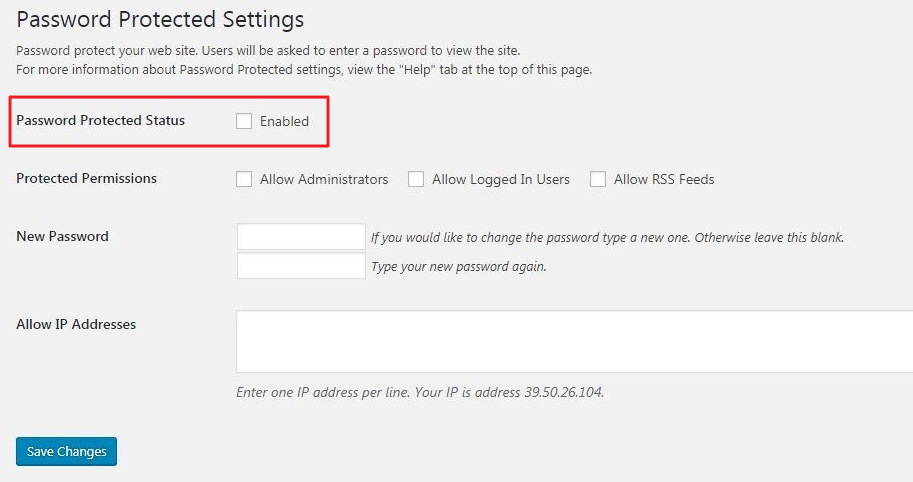
This page gives you a number of options to control who can access content on your WordPress website.
In order to password protect your entire website simply tick the Enable checkbox in front of the Password Protect Status option.
You can also tick the relevant choices in the Protected Permissions option to allow selected visitors to access your website without having to enter a password.
And the configuration options also allow you to set a password for your website using the New Password option.
If you want to allow specific users to access your website without password restriction, simply enter their IP addresses in the text box in Allow IP Addresses text box to whitelist them.
Conclusion
There are a number of different use case scenarios in which you may find yourself needing to password protect content on your WordPress website.
Let’s quickly recap the main points we covered:
- If you need to password protect a few posts or pages, simply use WordPress’ built-in option.
- And if you need to restrict access to certain parts of your post then you can use the Passster
- If you have a category or two that needs to be password protected, the Access Category Password plugin will help you out.
- And if you want to password protect your entire WordPress website in just a few clicks then we recommend going with the Password Protected
Do you have any questions about password protecting content on your WordPress website? Let us know by commenting below!