As a WordPress website owner you’ve likely thought of tweaking your theme to make it appear to be unique, to add some custom functionality to it, or simply to try out different calls to action.
Fortunately, there is an easy way to modify your theme’s design and functionality without worrying about losing your customizations: child themes. They allow you to preserve theme modifications and can even speed up your next WordPress development project.
With this in mind, in this post, we’ll talk about what child themes are and how they work within the context of WordPress. Then, we’ll walk you through a quick tutorial to show you how you can create and customize your own child theme – the right way.
Let’s get started!
The Basics of WordPress Child Themes
A child theme is essentially a theme that automatically inherits the design and functionality of another theme which we’ll call its parent theme.
When you activate a child theme on your website, WordPress will check to see if it has code for design or functionality in it. Since the functionality coded into the child theme overrides that of the parent theme, you’ll see the child theme’s design and functionality reflected on your website.
On the other hand, if the child theme doesn’t contain any code for implementing or modifying existing functionality then WordPress will refer to the parent theme’s files and apply those to your website.
Simply put, child themes are the themes that you add code to whenever you need to modify your theme’s design or its functionality. Here are a few reasons why you’d want to use child themes:
- Preserve modifications: The changes you make to your theme’s files directly will be lost whenever your update the (parent) theme.
- Organized code: Having separate files for custom code snippets will help you keep track of the modifications you make to your theme.
- Speedy development: Child themes inherit functionality from their parent themes which eliminates the need to rewrite chunks of code and speeds up development time.
Now that you’re familiar with what child themes are and why it’s a good idea to use them in your next WordPress development project, let’s take a look at how you can create your own.
How to Create a Child Theme in WordPress
Although most high-quality themes come with child themes right out of the box, it’s a good idea to know how to create one manually in case yours doesn’t or you’ve already used up the free child theme. The good news is that creating a child theme is super easy – even if you’re not particularly technically inclined!
To get started, you’ll need access to your site’s cPanel (or an FTP client) and a text editor. For the purpose of this tutorial, I’ll create a child theme for the Twenty Seventeen theme and create its files using cPanel.
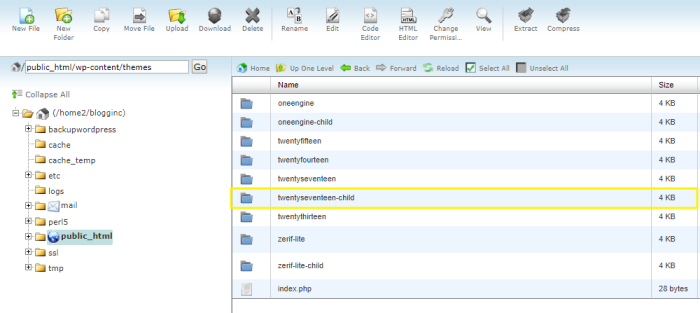
Step 1: Create a New Theme Directory in Your WordPress Install
To kick things off, log in to your cPanel account (or FTP client) and navigate to your site’s theme directory. It should be located in /wp-content/themes.
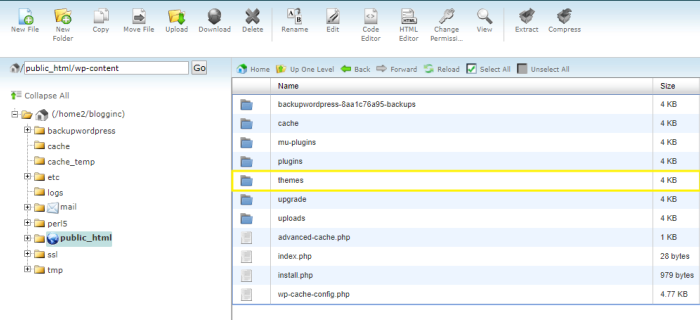
Next, create a new directory for the child theme and name it twentyseventeen-child. Giving the child theme the same name as the parent theme with a -child appended at the end is in line with the best practices.
Step 2: Create a style.css File for Your Child Theme
By now you should have an empty theme directory for the new child theme. In this step, we’ll create a stylesheet for it and add some code in it that’ll define its name and its parent theme. The code will also import the parent theme’s style sheet to the child theme.
Note: If your theme has multiple style sheets (yes, that’s entirely possible) then you’ll have to add the corresponding code snippet given in the following step, too.
Open up the new child theme directory (i.e. /wp-content/themes/twentyseventeen-child), create a new file in it, and name it style.css.
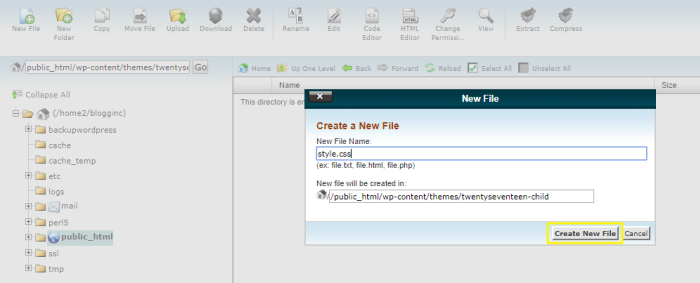
Next, copy and paste the following lines of code into the style.css file:
//GITHUB LINK: https://gist.github.com/rafaysansari/2de2313474572bba84adff6e7ebfd659

/*
Theme Name: Twenty Seventeen Child
Theme URI: https://www.yourwebsite.com/twentyseventeen-child
Author: Rafay Saeed Ansari
Author URI: http://www.blogginc.com/
Description: My first child theme. Parent theme: Twenty Seventeen.
Version: 2.5.0
Template: twentyseventeen
Text Domain: twentyseventeen-child
Tags: green, light, white, gray, black, one-column, two-columns, right-sidebar, fluid-layout, responsive-layout, photoblogging, left-sidebar, translation-ready
*/
@import url("../twentyseventeen/style.css");
In the lines of code given above, the values for Theme Name and Template define the child theme’s name and tell WordPress which theme to consider as the parent theme respectively. The @import line adds the parent theme’s CSS rules to the child theme which means that when you activate the child theme to your website you’ll be able to see both the content and its styling.
At this stage your child theme is (technically) ready to go. If you’re only going to make stylistic changes to your site’s theme then you can skip down to Step 4. However, if you think that you may need to modify your theme’s functionality or add custom functionality to it then you’ll need to add a functions.php file to your child theme’s directory.
Step 3: Create a functions.php File for Your Child Theme
As a WordPress developer you might want to add some custom bits of functionality to your WordPress theme. However, if you modify or add custom code to your (parent) theme’s functions.php file, the changes you make will be removed from the script whenever you update your theme to the latest version.
To preserve the changes you make to the functions.php file, we’ll create a separate functions.php file for the child theme, as well. Head over to your child theme directory (i.e. /wp-content/themes/twentyseventeen-child), create a new file in it, and name it functions.php.
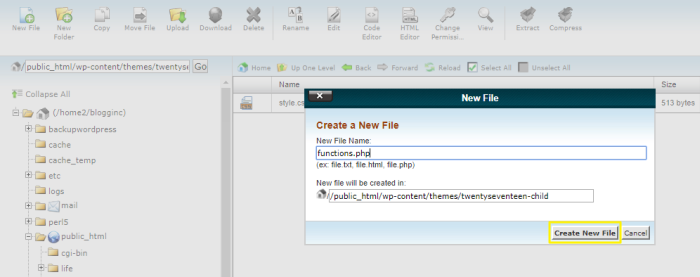
Next, copy and paste the following lines of code into the functions.php file:
//GITHUB LINK: https://gist.github.com/rafaysansari/66bcb59892740b515bdd813318729a8d

<?php
//* Add your code here
We’ve simply added the PHP open tags to the functions.php file in the code given above. Whenever you have to add custom functionality to your child theme all you have to do is add its code below the comment line (i.e. Line 2).
If your parent theme contains multiple style sheets then you’ll have to use the wp_enqueue_style() function to add the style sheets to your child theme without slowing down your site. To do this, simply add the following lines of code to the functions.php file:
//GITHUB LINK: https://gist.github.com/rafaysansari/c521c1e614a149e6802382cb64fd7560

add_action( 'wp_enqueue_scripts', 'enqueue_multiple_styles' );

function enqueue_multiple_styles() {
 wp_enqueue_style( 'parent-style', get_template_directory_uri().'/style.css' );
}
Step 4: Activate the Child Theme to Your Website
Now that our child theme is created and ready to go, let’s activate it to our WordPress website and test it out. Log in to your site’s admin panel and navigate to Appearance > Themes. The new child theme you created should be added to your list of installed themes.
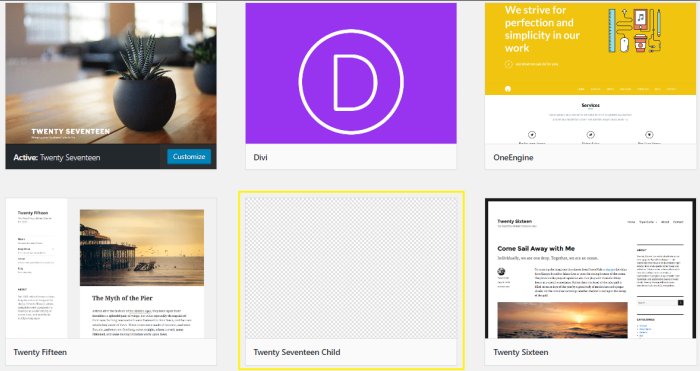
Click the Activate button to activate the child theme.
Now, when you preview your site on the front-end, it should look exactly like it did when the parent theme was activated. This is because we imported the parent’s theme’s style sheet in Step 2.
A Note on Customizing Child Themes
Your child theme is installed and activated on your website which means that you can finally start customizing it! Here’s a few different ways you can go about modifying your theme’s design and functionality:
Add custom CSS styles
To begin adding custom CSS code to your child theme, simply head over to Appearance > Editor and add it there. You’ll also be able to access the other files from this screen.
Play around with theme hooks
Action hooks will let you add custom functionality to your site’s theme whereas with filter hooks you can modify existing functions.
Include template files
If you’d like to make large-scale modifications to your theme (such as by defining a new template) then you can create template files for your child theme following the same steps for creating the style.css and functions.php files.
Conclusion
Using child themes is the recommended way to make modifications to your WordPress website’s theme. It allows you to eliminate the risk of losing customizations every time the parent theme updates and helps keep your custom code organized.
Let’s quickly recap the main steps you need to follow to create a child theme:
- Create a new theme directory in your WordPress install for the child theme.
- Create a new style.css file and add it to the child theme’s directory.
- Optionally, you can create a functions.php file for your child theme.
- Activate the child theme to your WordPress website and begin customizing it.